|
|
Using the JFC/Swing Packages |
With theJTreeclass, you can display hierarchical data.
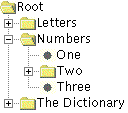
JTreedoesn't actually contain your data; it's simply a view of the data. Here's a picture of a tree:As the preceding figure shows,JTreedisplays its data vertically. Each row contains exactly one item of data (called a node). Every tree has a root node (called Root in the above figure) from which all nodes descend. Nodes that can't have children are called leaf nodes. In the above figure, the look-and-feel marks leaf nodes with a circle.Non-leaf nodes can have any number of children, or even no children. In the above figure, the look-and-feel marks non-leaf nodes by drawing a folder. Typically, the user can expand and unexpand non-leaf nodes -- making their children visible or invisible -- by clicking them. By default, non-leaf nodes start out unexpanded.
When you initialize a tree, you create a
TreeNodesetAllowsChildren(true)on it.The rest of this page discusses the following topics:
- Creating a tree that reacts to selections
- Customizing the display of the tree
- Dynamically changing a tree
- Creating a data model
- The tree API
- Examples that use trees
Creating a Tree that Reacts to Selections
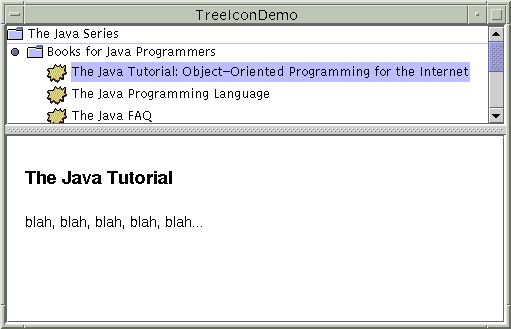
Here is a picture of an application, the top half of which displays a tree in a scroll pane.
Try this:
- Compile and run the application. The source file is
TreeDemo.java.
See Getting Started with Swing if you need help.- Expand a node.
You can do this by clicking the circle to the left of the item.- Select a node.
You do this by clicking the text for the node or the icon just to the left. The file displayed by the lower half of the window displays a file that reflects the currently selected node.
Below is the code from
TreeDemo.javathat implements the tree in the preceding example.public TreeDemo() { ... //Create the nodes. DefaultMutableTreeNode top = new DefaultMutableTreeNode("The Java Series"); createNodes(top); //Create a tree that allows one selection at a time. JTree tree = new JTree(top); tree.getSelectionModel().setSelectionMode (TreeSelectionModel.SINGLE_TREE_SELECTION); //Listen for when the selection changes. tree.addTreeSelectionListener(new TreeSelectionListener() { public void valueChanged(TreeSelectionEvent e) { DefaultMutableTreeNode node = (DefaultMutableTreeNode) (e.getPath().getLastPathComponent()); Object nodeInfo = node.getUserObject(); if (node.isLeaf()) { BookInfo book = (BookInfo)nodeInfo; displayURL(book.bookURL); } else { displayURL(helpURL); } } }); //Create the scroll pane and add the tree to it. JScrollPane treeView = new JScrollPane(tree); ... add(treeView); ... } private class BookInfo { public String bookName; public URL bookURL; public BookInfo(String book, String filename) { bookName = book; ...//Set bookURL... } //This is what will be shown in the tree public String toString() { return bookName; } } ... private void createNodes(DefaultMutableTreeNode top) { DefaultMutableTreeNode category = null; DefaultMutableTreeNode book = null; category = new DefaultMutableTreeNode("Books for Java Programmers"); top.add(category); //Tutorial book = new DefaultMutableTreeNode(new BookInfo ("The Java Tutorial: Object-Oriented Programming for the Internet", "tutorial.html")); category.add(book); ... category = new DefaultMutableTreeNode("Books for Java Implementers"); top.add(category); //VM book = new DefaultMutableTreeNode(new BookInfo ("The Java Virtual Machine Specification", "vm.html")); category.add(book); //Language Spec book = new DefaultMutableTreeNode(new BookInfo ("The Java Language Specification", "jls.html")); category.add(book); }Customizing the Display of the Tree
A tree uses a single renderer to draw all of its nodes. By default, this renderer is an instance ofDefaultTreeCellRenderer
Note: In the Swing 1.0 releases,DefaultTreeCellRendererused to be calledBasicTreeCellRendererand was part of thecom.sun.java.swing.plaf.basicpackage.
You can easily customize the way
DefaultTreeCellRendererdisplays the tree's nodes. For example, it contains methods that let you set the icons used for the tree's nodes. To customize the renderer, just create an instance ofDefaultTreeCellRenderer, invoke one or more of itssetXxxmethods, and then make the instance the tree's renderer. The following figure shows an application that changes the renderer so that it uses a custom leaf icon.Here's the code that sets the icon (the whole program is
TreeIconDemo.java):DefaultTreeCellRenderer renderer = new DefaultTreeCellRenderer(); renderer.setLeafIcon(new ImageIcon("images/middle.gif")); tree.setCellRenderer(renderer);Dynamically Changing a Tree
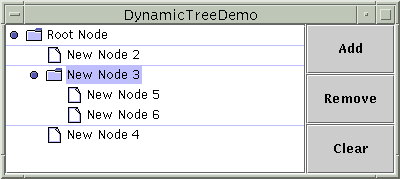
The following figure shows an application that allows you to dynamically add nodes to a tree. You can also edit the text in each node.The application is based on an example provided by tutorial reader Richard Stanford. You can find the source code inDynamicTreeDemo.javaandDynamicTree.java.[PENDING: explain the example]
Creating a Data Model
[PENDING: write and explain an example. Does anyone have an easy-to-understand example they'd like to share? It should include basic searching. If you'd like to help, please e-mail tutorial@java.sun.com. Thanks!]The Tree API
[PENDING: API discussion to follow.]Examples that Use Trees
[PENDING: List any examples]
|
|
Using the JFC/Swing Packages |