|
|
Overview of the Java UI |
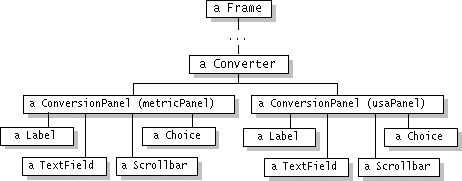
The example program (see above) has several levels in its Component hierarchy. The parent of each level is a Container (which inherits from Component). Below is a figure of the hierarchy.
Explanation
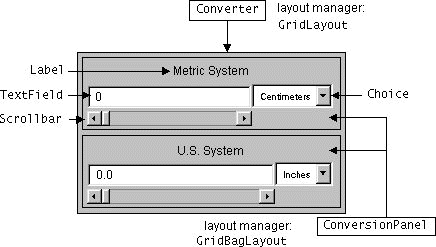
At the top of the hierarchy is the window (Frame instance) that displays the program. When the example program runs as an application, the Frame is created in the program'smain()method. When the example runs as an applet within a browser, the Frame is the browser window.Under the Frame is a Converter object, which inherits from Applet and thus is a Container (specifically, a Panel). Depending on what viewer the applet is displayed in, one or more Containers might be between the Converter object and the Frame at the top of the Component hierarchy.
Directly under the Converter object are two ConversionPanels. The following code puts them under the Converter, using the
add()method. Converter inherits theadd()method from the Container class (Converter extends Applet, which extends Panel, which extends Container).Each ConversionPanel has four children: a Label, a TextField, a Scrollbar, and a Choice. Here's the code that adds the children:public class Converter extends Applet { . . . public void init() { ...//Create metricPanel and usaPanel, two ConversionPanels. add(metricPanel); add(usaPanel); . . . }GridBagConstraints is an object that tells the GridBagLayout (the layout manager for each ConversionPanel) how to place a particular component. GridBagLayout, along with the other AWT layout managers, is discussed in Laying Out Components within a Containerclass ConversionPanel extends Panel { . . . ConversionPanel(Converter myController, String myTitle, Unit myUnits[]) { . . . //Add the label. It displays this panel's title, centered. Label label = new Label(myTitle, Label.CENTER); ...//Set up GridBagConstraints for this Component. gridbag.setConstraints(label, c); add(label); //Add the text field. It initially displays "0" and needs //to be at least 10 columns wide. textField = new TextField("0", 10); ...//Set up GridBagConstraints for this Component. gridbag.setConstraints(textField, c); add(textField); //Add the pop-up list (Choice). unitChooser = new Choice(); ...//Populate it with items. ...//Set up GridBagConstraints for this Component. gridbag.setConstraints(unitChooser, c); add(unitChooser); //Add the slider. It's horizontal, its initial value is 0, //a click increments the value by 100 pixels, and it has the //minimum and maximum values specified by the instance variables //min and max. slider = new Scrollbar(Scrollbar.HORIZONTAL, 0, 100, min, max); ...//Set up GridBagConstraints for this Component. gridbag.setConstraints(slider, c); add(slider); }.
Summary
The example program's Component hierarchy contains eight non-Container Components -- Components that present the graphical UI of the program. These are the Labels, TextFields, Choices, and Scrollbars the program displays. There might be additional Components such as window controls under the Frame.This program's Component hierarchy has at least four Containers -- a Frame (window), a Converter (a custom kind of Panel), and two ConversionPanels (another custom Panel).
Note that if we add a window -- for example, a Frame that contains a Converter instance that handles distance conversion -- the new window will have its own Component hierarchy, unattached to the hierarchy this lesson presents.
|
|
Overview of the Java UI |